Today’s post will be devoted to working with a burnable photopolymer. In this process, we will print the model using a 3D printer and then cast it into a metal product, including silver, bronze, and brass. We’ll explore the importance of the calcination cycle and the consequences of any violations. Burnt-out photopolymer is a unique material, differing from injection wax, which requires an understanding of multiple processes.

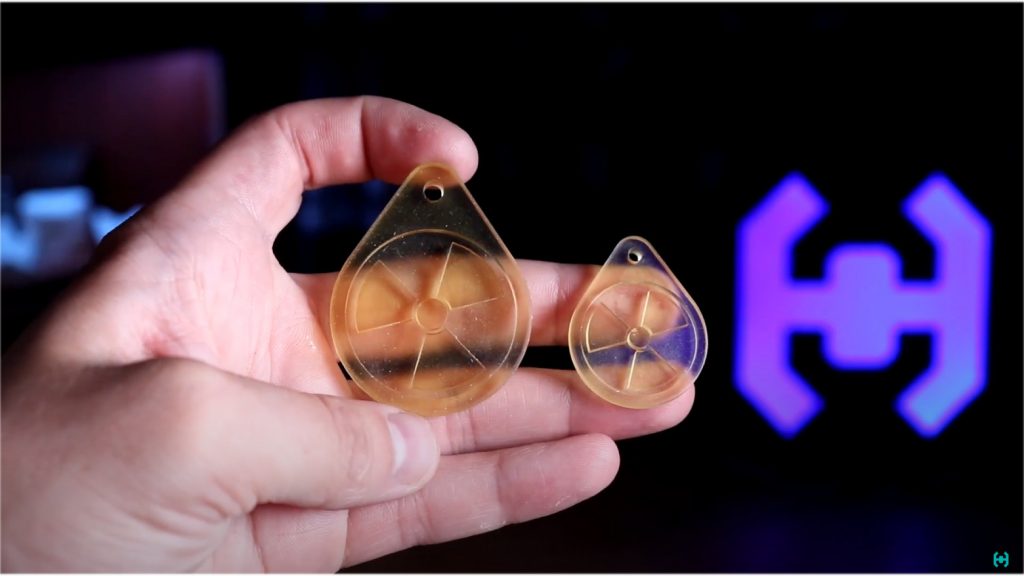
Brand of a specific burn-out photopolymer GORKY LIQUID CASTABLE LCD. The color of the resin is translucent yellow and the manufacturer claims that it is excellent for making models of dental implants and jewelry. In one of the previous posts , we considered the subtleties and nuances of printing with various photopolymers, each resin turned out to be unique in its own way, therefore I recommend viewing it for those who have not seen it.
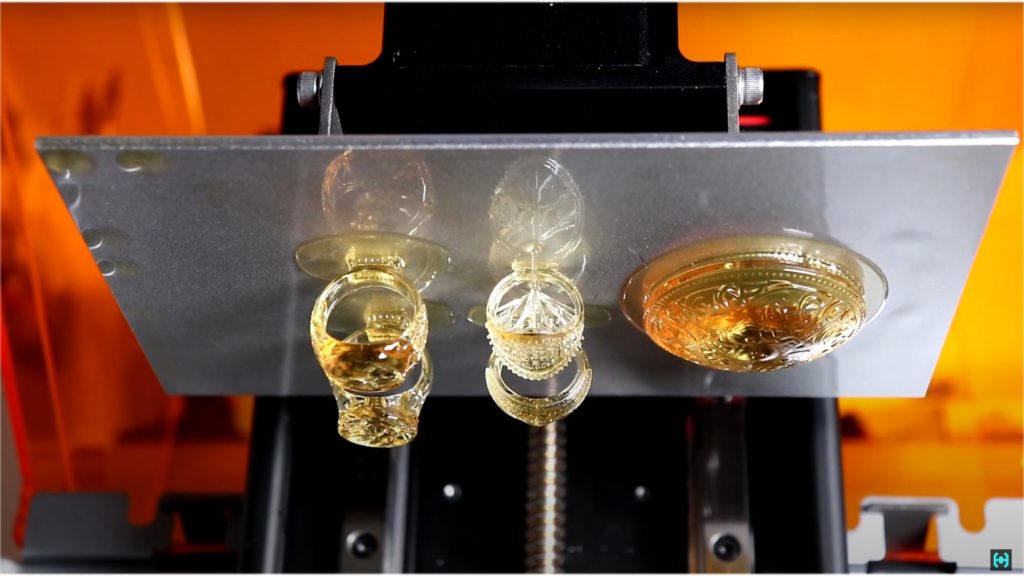
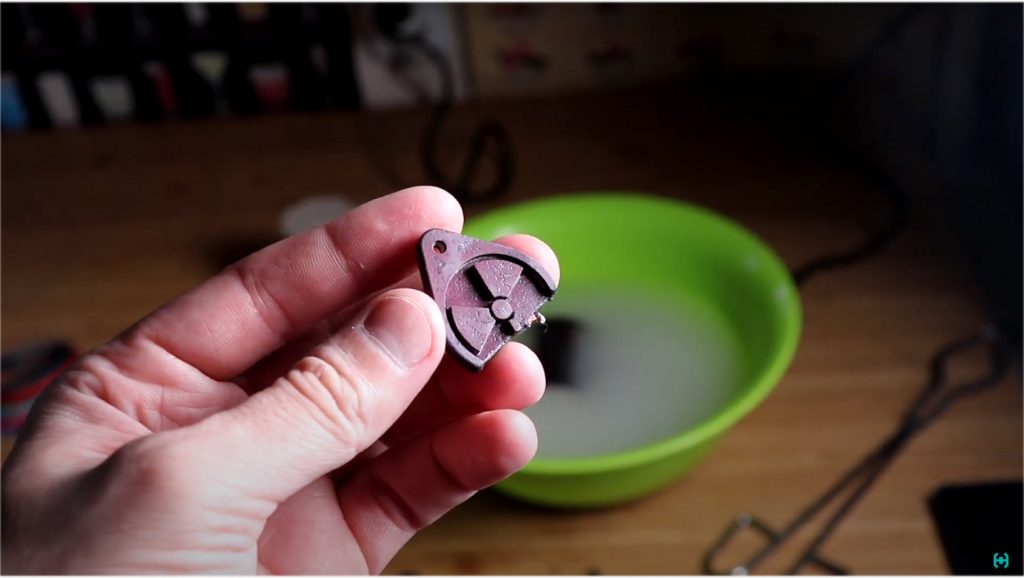
Today’s task will be casting a keychain for keys in the form of a radio hazard sign taken from the Thingiverse resource. The model initially has a fairly large size, which will require more silver. In the program, we reduce the dimensions of the product by 30% and send the file for printing. The layer height here is 50 microns, the print time is about an hour on a CREALITY HALOT-SKY photopolymer printer. We wash it in an ultrasonic bath and see what happens.
At the initial stage of preparation for casting, sprues from injection wax must be installed on the products . The fact is that this photopolymer does not melt, but on the tip of the soldering iron it immediately turns into a light smoke, bypassing the liquid phase. It is quite simple to make sprues from wax, it is enough to vulcanize a couple of twigs of the required diameter. The specific execution is rather crooked, but this will not affect the result of the castings in any way.
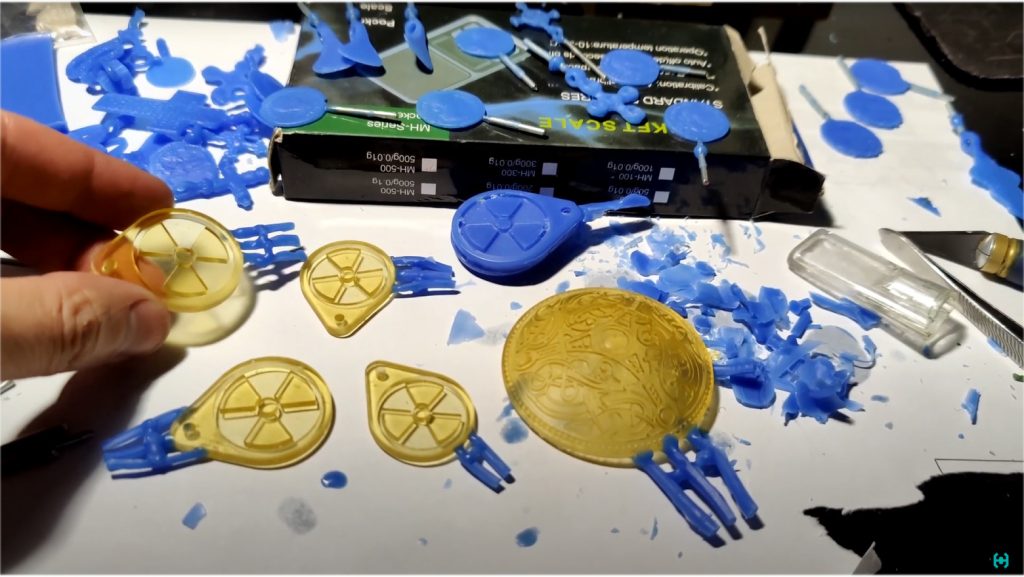
For a couple of hours, a handful of models had gathered on the table, ready for work and defense. The whole operation took place under the TV series “Very strange things” in the company of good French green tea. At the same time, other waxes are being prepared for casting historical objects at the request of friends.
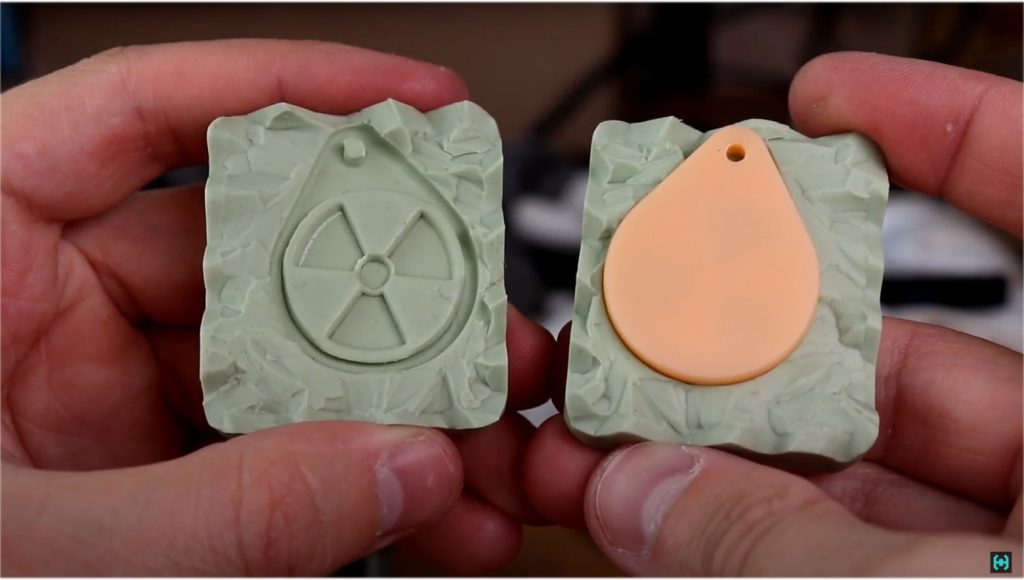
Perhaps it was the most massive casting in the history of the channel with the preparation of several issues at once in advance. In parallel with the printing of the burnt-out photopolymer, there was an attempt to vulcanize the model to obtain an accurate cast, but, unfortunately, the remains of the jewelry rubber turned out to be expired and all the work went down the drain.
Under the old rollers, drawings and the electrical circuit of the vulcanizer are often asked. Here is the archive with the necessary files. The control circuit is based on the Attiny2313 microcontroller and the DS18B20 digital temperature sensor. The same scheme is used as automation in the process of distillation of ethyl alcohol at home.
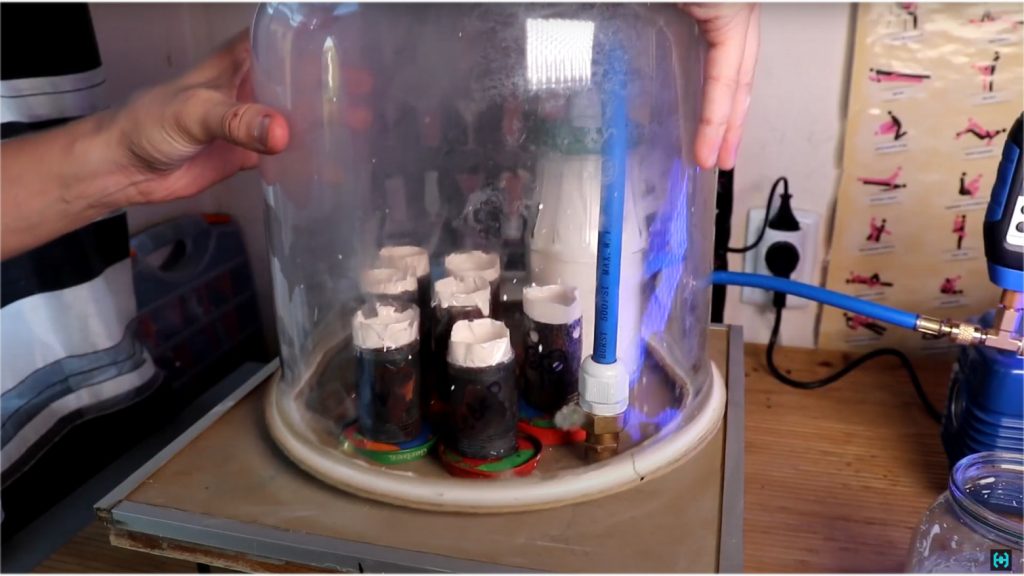
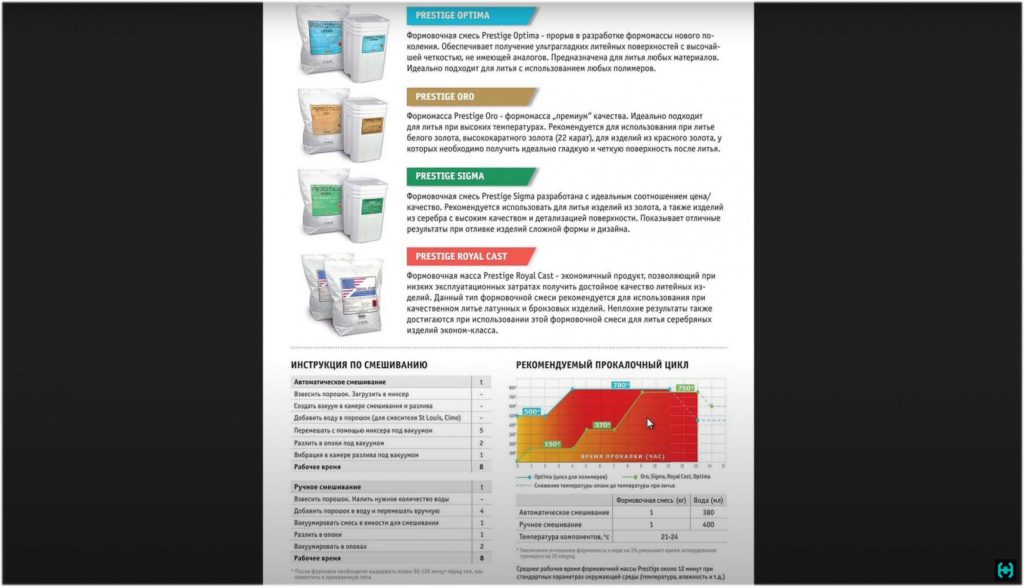
Before pouring, the flask must be wrapped with adhesive tape, otherwise the molding composition will all run away during vacuuming. We cover the model installed in plasticine with a piece of pipe and fill it with molding sand. Often I see comments “what kind of plaster do I use”? This is not gypsum, but a special jewelry mixture Prestige ORO, the ratio of water and powder is 1: 2.5. The composition is specially selected for minimal shrinkage during the calcination process. We pour the powder into the water, after which we quickly and thoroughly mix everything, lumps are unacceptable here.
The life of this cocktail is eight minutes. During this time, you need to have time to mix everything, vacuum the composition for several minutes to get rid of excess bubbles, pour everything into the flasks and again vacuum all this swamp. I will say in advance that this procedure completely eliminates the bead on the castings. Before, without such equipment, I had problems with this.
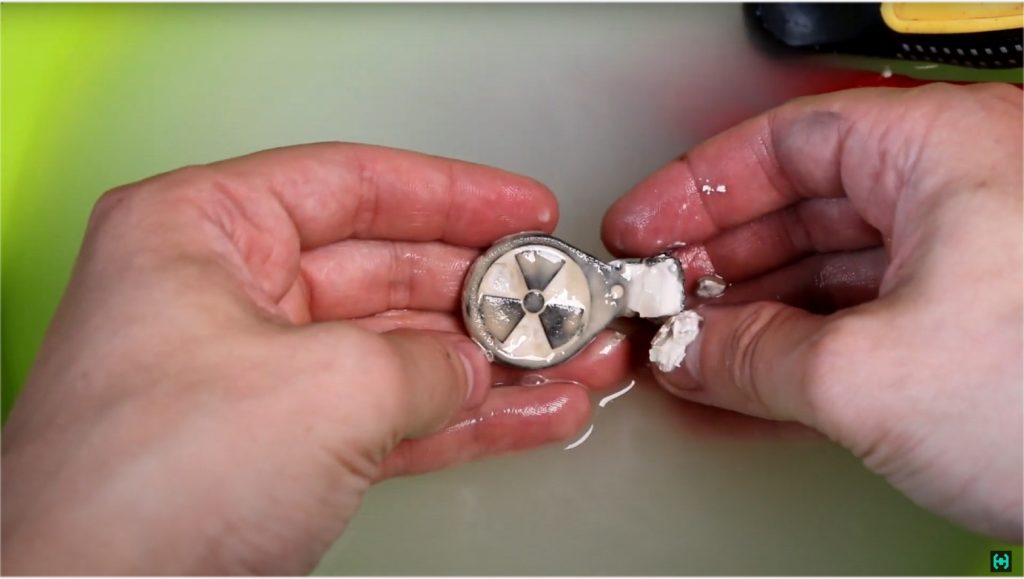
Preparation of flasks before casting. We remove the tape, as we will no longer need it. Sprues in the form of nails are easier to remove if they are dipped in wax beforehand, and external heating will allow the metal to be removed without damaging the channels. With a drill we make a small countersink of the holes. It is important that debris does not get inside. We must sign the opoki. If you do not do this procedure later, FIG understand what, where is located, once burned at this stage.
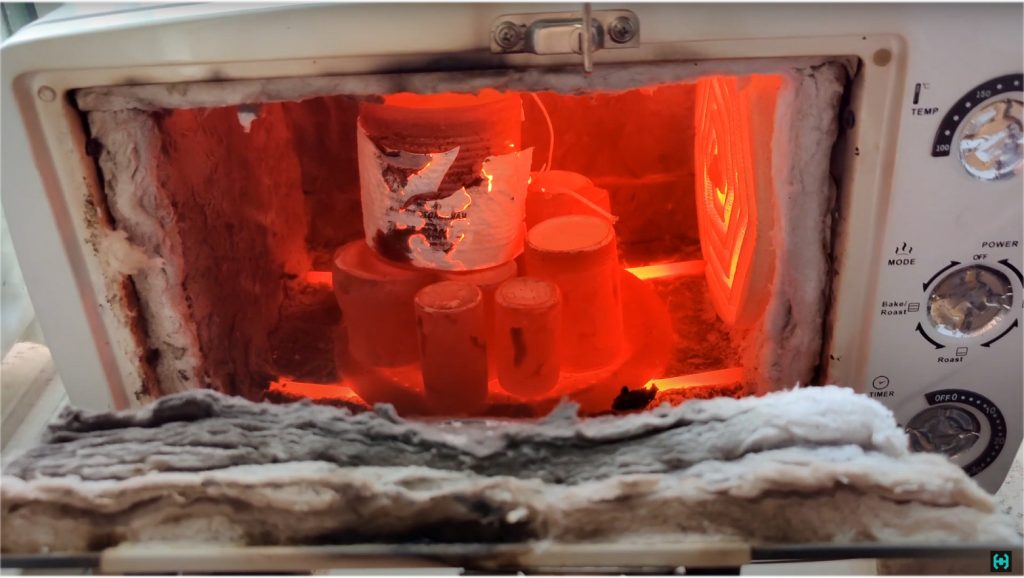
Burning cycle. A K-type thermocouple is an extremely insidious thing, thin – after heating it constantly breaks down and needs to be repaired, and a thick one – as evil as it is, has simply enormous inertia and heat loss through metal contacts protruding from the outer part of the case.
This led to the fact that instead of the established 700 degrees, all 830 degrees were in the furnace . Complete chaos. Sometimes this led to the fact that opening the oven door incinerated you like Sarah Connor during the nuclear apocalypse. Such a calcination mode is no good, since the sand can crack and flash on the castings. I am silent already about the burning of wires at critical temperatures, the contacts must be located as far as possible from the place of heating.
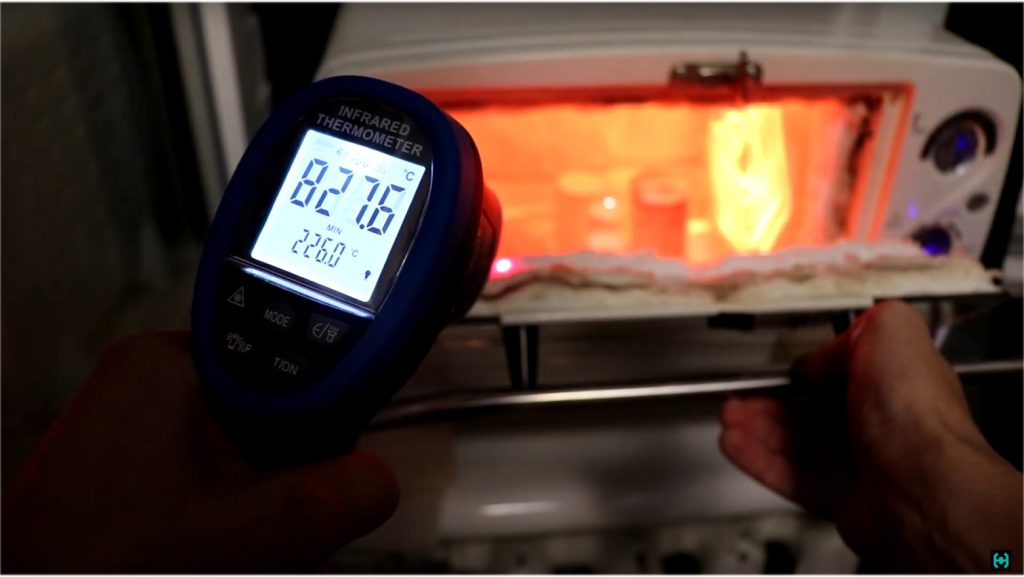
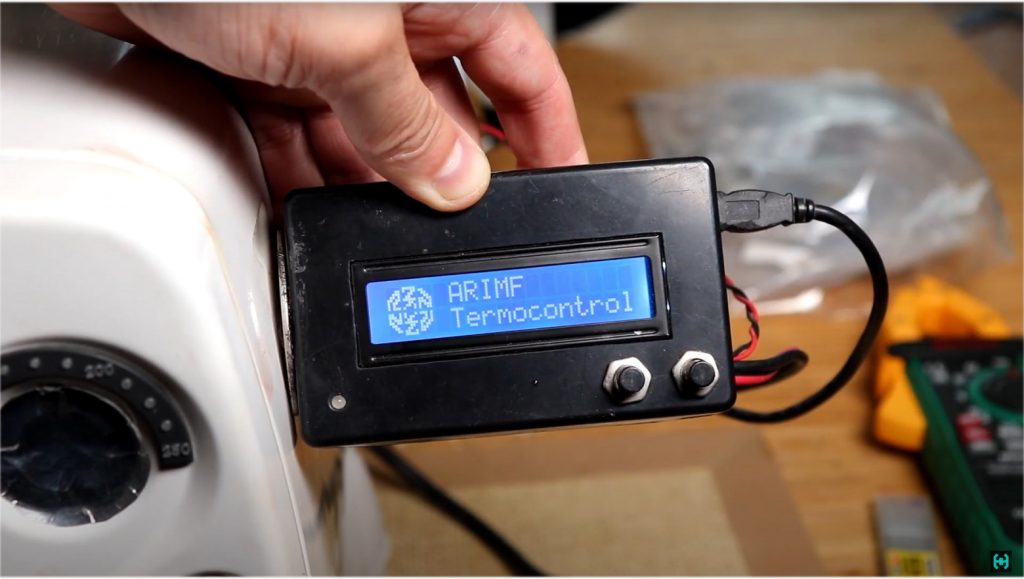
A simple example of how a thick thermocouple lies. Spread over 20 degrees on the first baking shelf. Temperature adjustments had to be made experimentally. Every time I remember Timofey from the ARIMF foundry when I start calcining on this furnace. The thermal controller is his brainchild, which has proven itself in many foundries. He recently released a new video on the channel, I recommend everyone to watch it!
After selecting the temperatures, the required 740 degrees are reached at 655. The measurements coincided both on an independent thermometer with a thermocouple and with a pyrometer.
Each molding sand comes with instructions for the firing cycle. Here is a simple example for our composition. Here you can see specific shelves for temperatures at a certain time. The whole process takes 15 hours. I was very surprised by the blue graph for photopolymers, the fact is that with an instant heating of 500 degrees, the flask, in theory, should be torn apart due to the huge amount of moisture inside. And in the instructions for the Gorky Liquid photopolymer, the cycle is different from what the manufacturer of the molding mixture Prestige ORO claims. And figure out who to believe. Let’s go as always by experience.
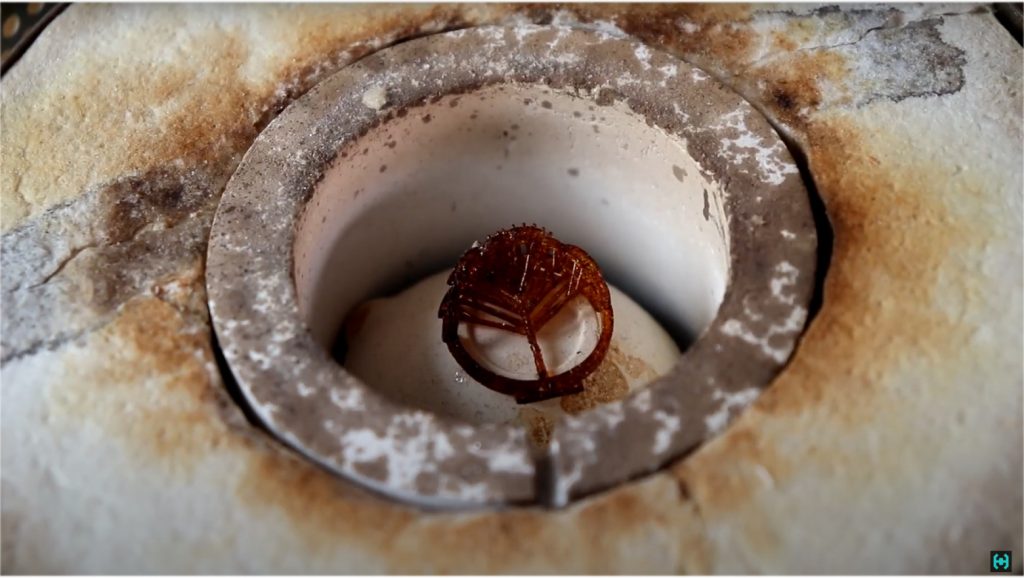
First you need to determine at what temperature the photopolymer burns out. To do this, we will gradually increase the speed in the metal melting furnace and watch when the jewelry ring starts to evaporate. The color change of the model started to change at 350 degrees. At the same time, it looked extremely mystical, the ring gradually darkened, remaining in its original form until it turned into a pile of coal, which no longer burned out.
How is it, in the last post I showed that this resin burns out without leaving the slightest trace, and here it is. We don’t panic. I repeated the experiment by putting the ring in an already heated oven. The product disappeared in a couple of hours, leaving behind only a black drip at the bottom of the crucible. It seems that the photopolymer annihilates when heated gently when exposed to oxygen. I had to open the stove many times during the first experiment, and this turned the product into coals.
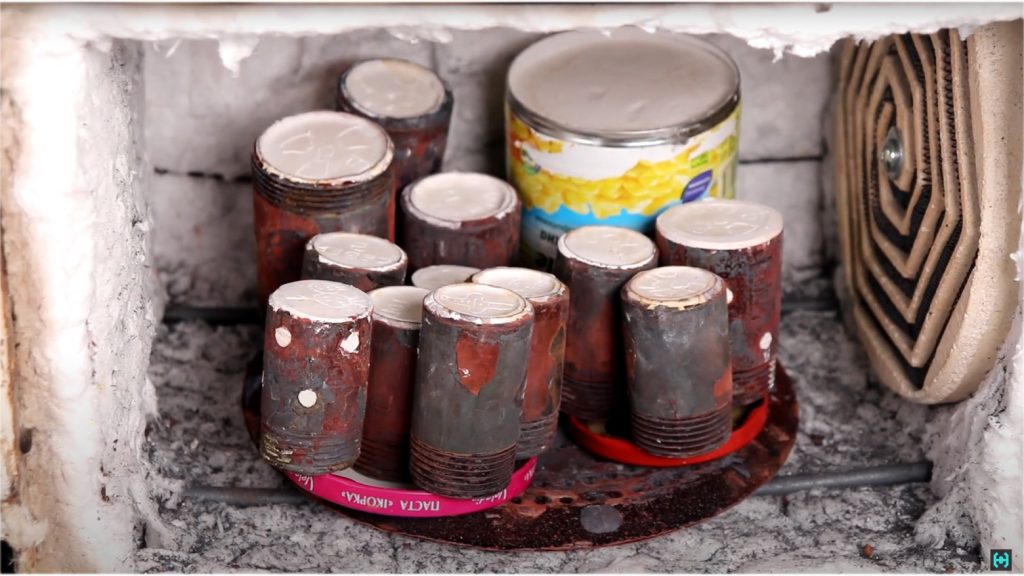
We print additional models for experiments. Take a Viking style brooch and set it up for pouring along with a regular wax model. A jar of olives will act as a flask. Different calcination cycles were checked and therefore I simply did not have time to find metal cans in local trash cans.
The whole process must take place in a well-ventilated room, otherwise the spirit coming from the cracks of the furnace will stink everything. Therefore, calcination takes place under the air conditioner. There is nothing for the box to overheat again. This is only one third of those flasks that were being prepared for casting, mass production, so to speak …
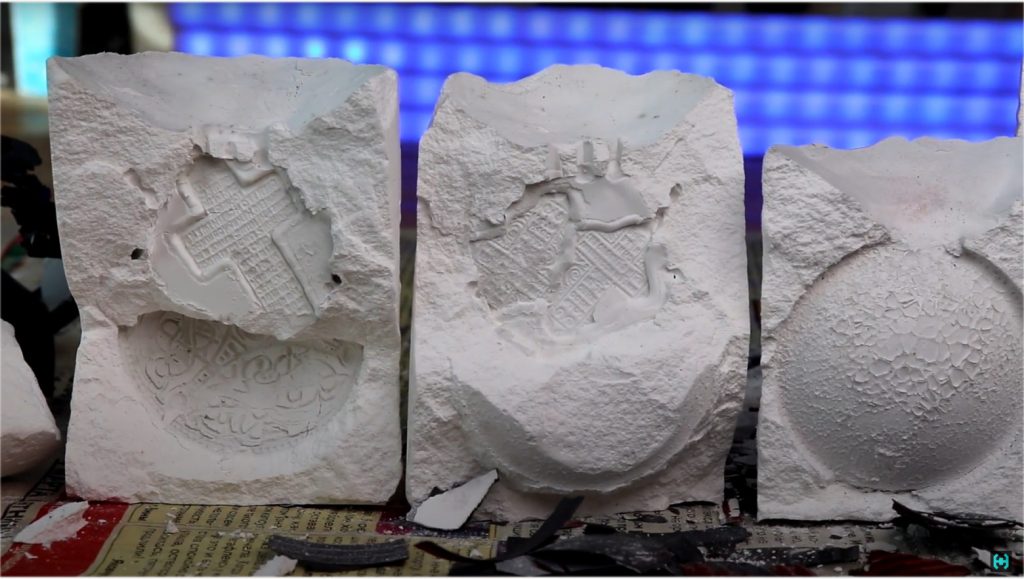
We have three flasks. The last one has the least cracks and this is no accident, let’s figure it out. First sample. A jar of olives crunches in your hands like chips during a football game. The steel has turned to dust. We break the resulting dish into two halves and see what’s inside.
This calcination cycle lasted 7 hours and it was up to the correction of the furnace temperature. The surface of the molding mass here is similar to the whitewashing of the ceiling in the cellar, everything is cracked. Now the most interesting. Having reached the product from injection wax, a completely different picture appeared here. He absolutely does not care about the violation of the calcination cycle, the surface here is even and has no visible defects.
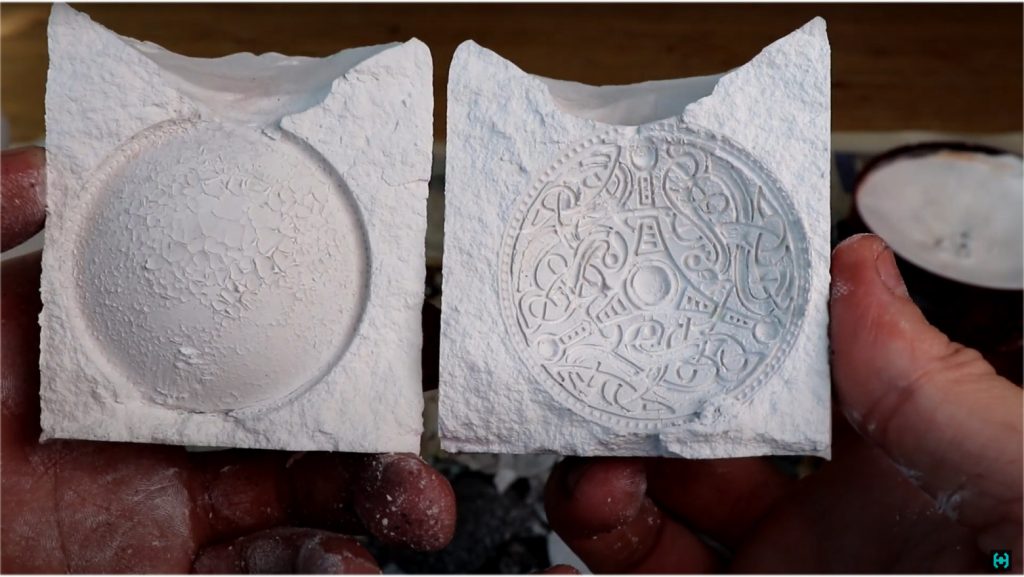
We open the second flask, the calcination time is 8 hours, the temperature was selected from the rubric with a finger to the sky. What was interesting inside? The same injector wax cross on a common basis showed an unpredictable result, one surface was perfect, and the second was covered with dandruff. Also one of the crosses cracked.
We open the last can of corn. This cycle lasted 10 hours and was somewhere close to the manufacturer’s recommendations. This sample best explains why the photopolymer destroys the inner surface. The fact is that with insufficient drying of the flask, a small amount of moisture remains in the composition, when the resin burns out and comes into contact with water, the surface of the mixture breaks into sausage.
Therefore, the conclusion follows from this that the initial drying shelves should be extended for at least a couple of hours over those recommended by the instructions, this is especially true for large flasks.
The metal ratio for jewelry wax and silver is 1 to 11. That is, if the wax weighs 1.56 grams, then we multiply the figure by 11 plus a couple of grams per sprue and get the amount of silver needed for the future product. For a photopolymer, this ratio is 1 to 7.5, it is much denser, unlike wax.
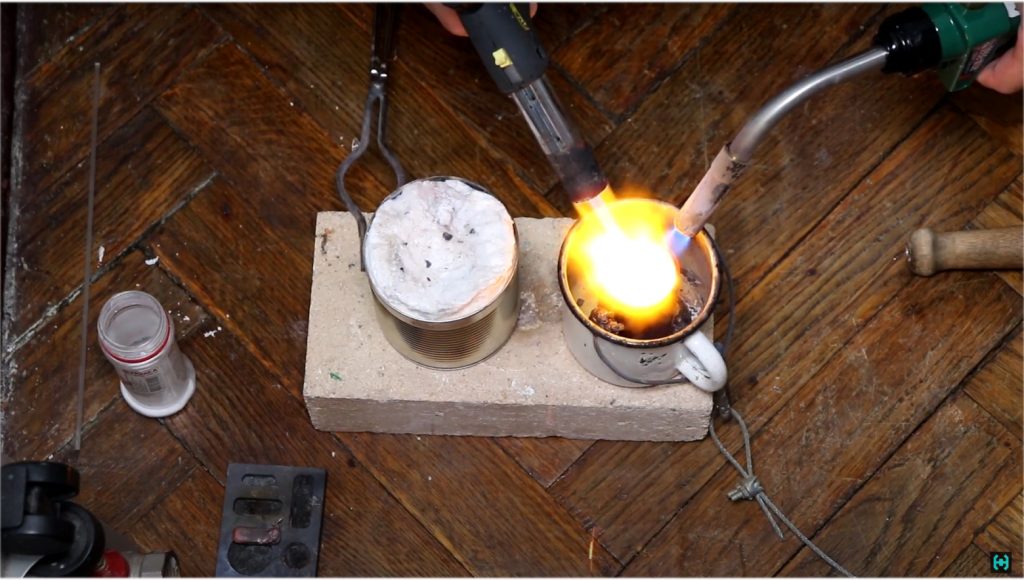
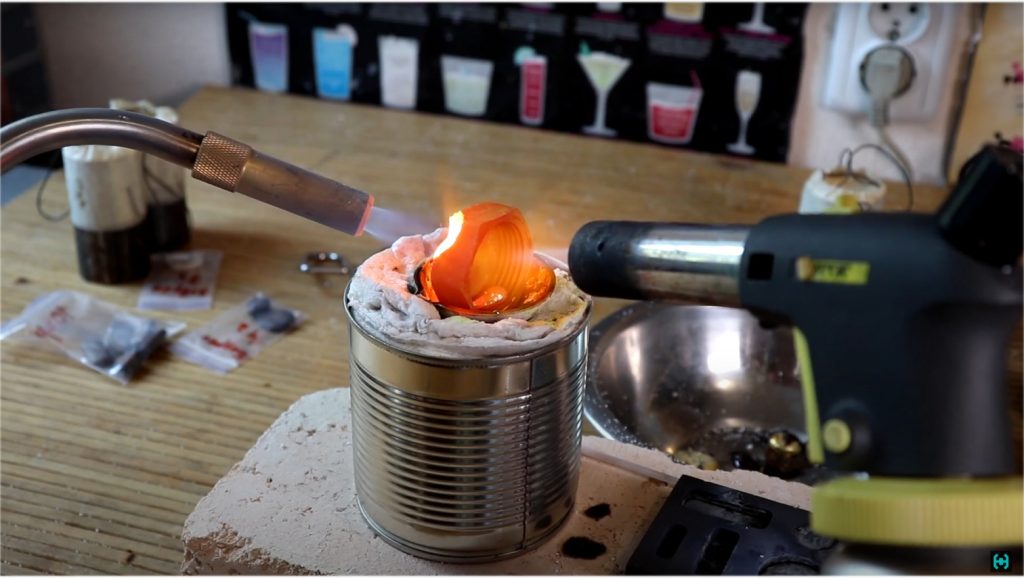
Well, let’s get down to the foundry craft. I recommend getting heat-resistant gloves for such things, since the infrared radiation of the muffle oven bakes hands to the state of barbecue in a couple of seconds, and there is a distinct aroma of burnt hair in the air.
So that the metal does not oxidize during melting, we sprinkle it with borax, it swells like popcorn when heated and scatters around the neighborhood. If the amount of metal is large, then it is heated by two burners. Well, then, as always, according to the classics, a mug and centrifugal casting come into play.
The first pancake is lumpy. Underfilling due to the fact that he incorrectly calculated the coefficients of silver and photopolymer. Or I took silver, I don’t remember. The second attempt and also underfilled, this time the silver broke through the bottom of the flask and partially spilled into the mug. Didn’t add a little molding sand.
MAPP gas is used to melt the metal, giving a maximum flame temperature of approximately 1900 degrees. Honestly, I didn’t notice such temperatures, but it fries well compared to a conventional butane burner.
This time I put silver with a margin. I sprinkle the contents with brown so that the metal does not oxidize in the flame of the burner and warm it up for several minutes so that there is a margin of temperature. The most exciting moment. Since this was not the first casting attempt, calluses began to form on the right hand, and the wife is now away)
Water procedures showed that a new product was born, it is necessary to remove it and rinse it in water. Surprisingly, the model completely spilled on only the third attempt, which is good news.
Then I used antique bronze melts, which were used in one of the previous films, where we cast a bronze celt. How to find such bronze do not ask, this is a long story and there is something to talk about.
We melt bronze with the help of two gas burners in parallel, sprinkling the contents of brown and pour everything into a graphite mold. I don’t know the coefficient of bronze and photopolymer, I took the amount of metal by eye. We wave a mug. One day, I saw a neighbor in the window, who was watching this process from a neighboring house. He clearly did not understand what was happening, but at the same time he burned me with his eyes. Don’t look into other people’s windows!
The casting surprisingly turned out the second time, on the first I forgot to turn on the video recording on the camera, but everything was sad there, the metal was underheated.
We will also try to cast it from brass. Foundry brass can be obtained from plumbing fittings, in this particular case, it is a pipe cap. After warming up for a couple of minutes, the product began to give up and drip down to the bottom of the crucible. Since childhood, I dreamed of taming metal and turning it into something unusual.
When melting brass, I remembered the school disco of the 2000s, the songs of the Hands Up group were played there, there was a smoke generator and a strobe light that blinked into the crowd of stoned youngsters who did not understand the essence of their meaningless existence. I often ask myself: What will be left of all this in a billion years? Obviously nothing good. I wake up with this thought every morning.
The brass seemed to have spilled and left colorful bright yellow marks on the surface. Breathing zinc is very useful , therefore I do not recommend such therapy regularly! We cool the flask in cold water. At first glance, everything is wonderful. You can see the sign of the radio hazard. But in fact, we are in for a disappointment. It feels like the metal has frozen in the flask right in the process of waving the mug. Everything was spilled except for the top, the metal was clearly underheated.
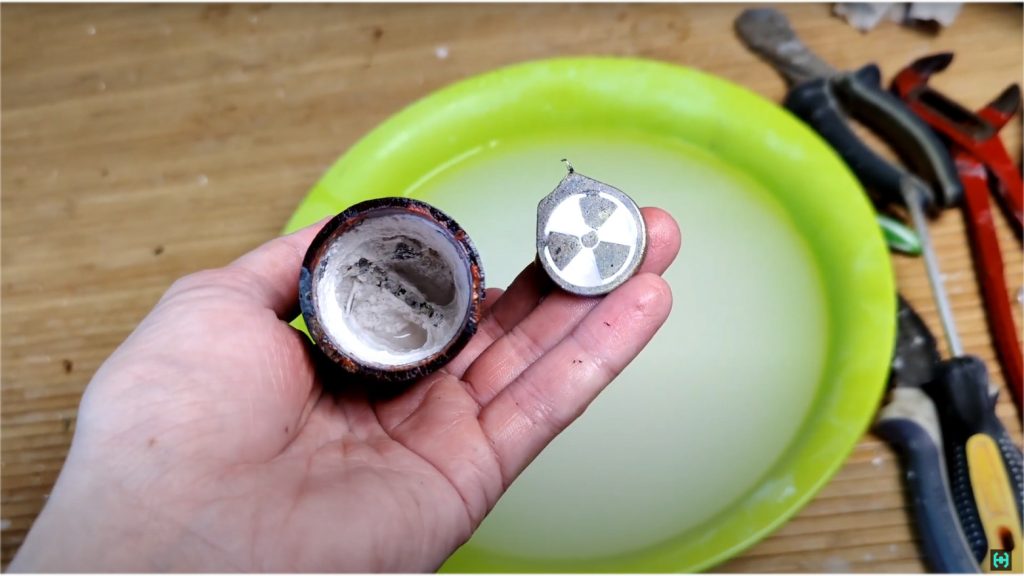
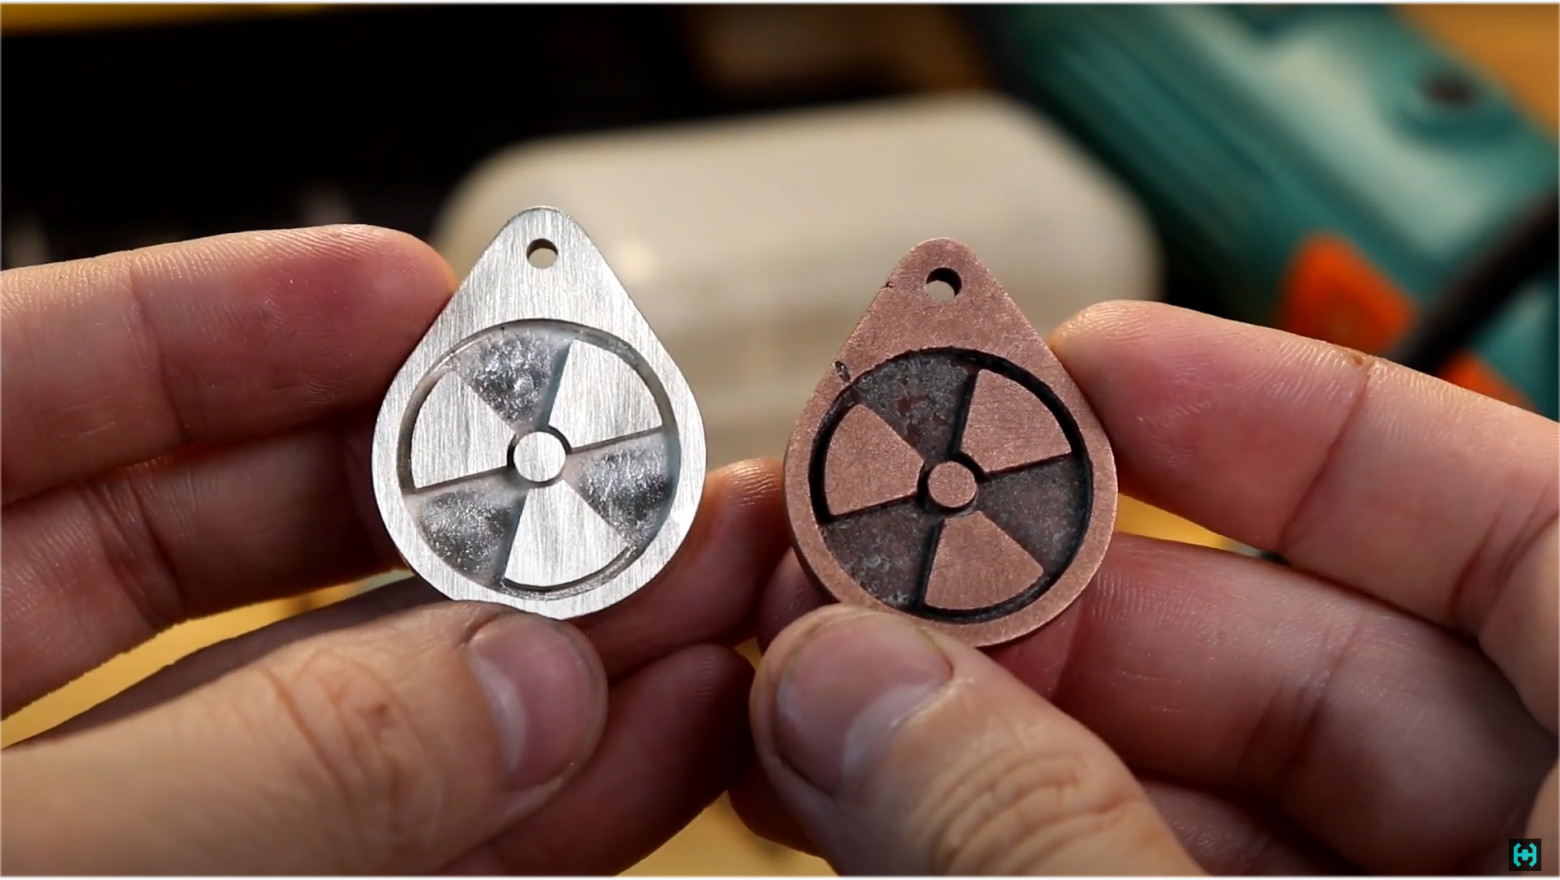
As a result, such a collection of wonderful motley products has been collected. Some will go to the smelter, and some will be further processed. We boil the blanks in citric acid. Upon a detailed examination of the metal, the edges of the products are striking. On silver they are sharp, correct. On bronze, the corners are sluggish, smoothed. The fluidity of silver is clearly higher.
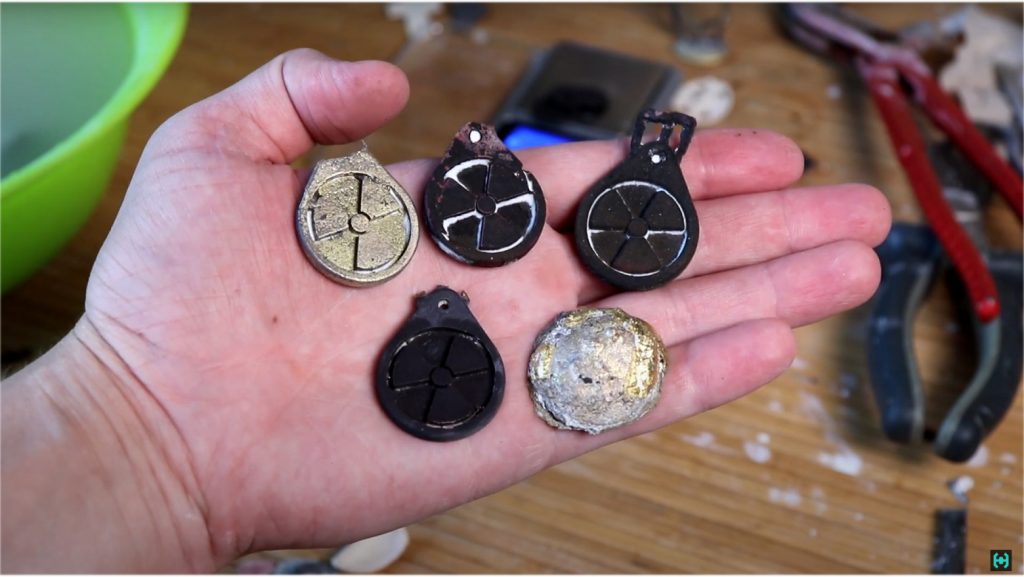
Product processing. Rough artillery in the form of files and needle files is used. It is necessary to remove the remains of the gating system and align all planes. A detailed examination of the metal revealed a shell on the reverse side of the product. We will close it with solder for soldering with three percent silver. The color of the metal will be different, but this is not critical. With a diamond nozzle, we remove the flash in the canyons of the relief. We draw even planes on sandpaper. At the beginning we use large grain, and then small in descending order.
At the very end, a fine-grained water stone was used, the surface was left satin with small scratches. This processing method is often used for knife blades. All silver dust during metal processing is not thrown away, but is collected in a separate bag for subsequent remelting. As a result, a drop of a couple of grams was obtained from this garbage. We turn waste into income, as they say.
In parallel, on sandpaper, we draw a plane on a bronze blank. This time we will make the surface matte using 30% nitric acid. Ten minutes and you’re done. Such products eventually turned out. One is made of silver, and the other is made of bronze that has lain in the ground for several thousand years.

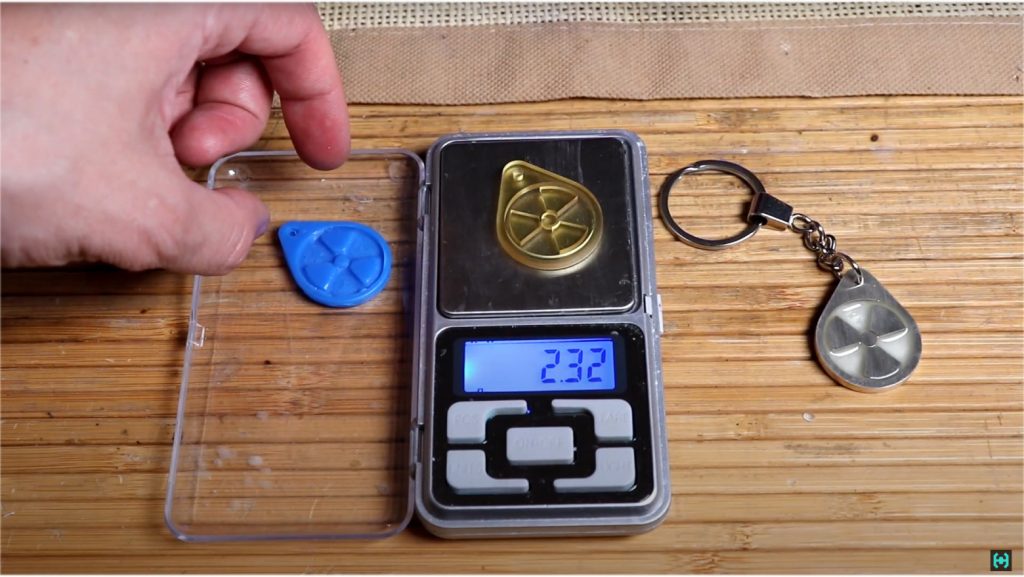
Let’s move on to the most interesting chapter of the story. Turning a product into an artifact. To do this, we need glow-in-the-dark powder. You can get it from old Soviet watches or knife switches. We collect a permanent luminous mass based on radium 226 in a separate bag and … I’m joking! Such a light-accumulative pigment is sold on aliexpress.
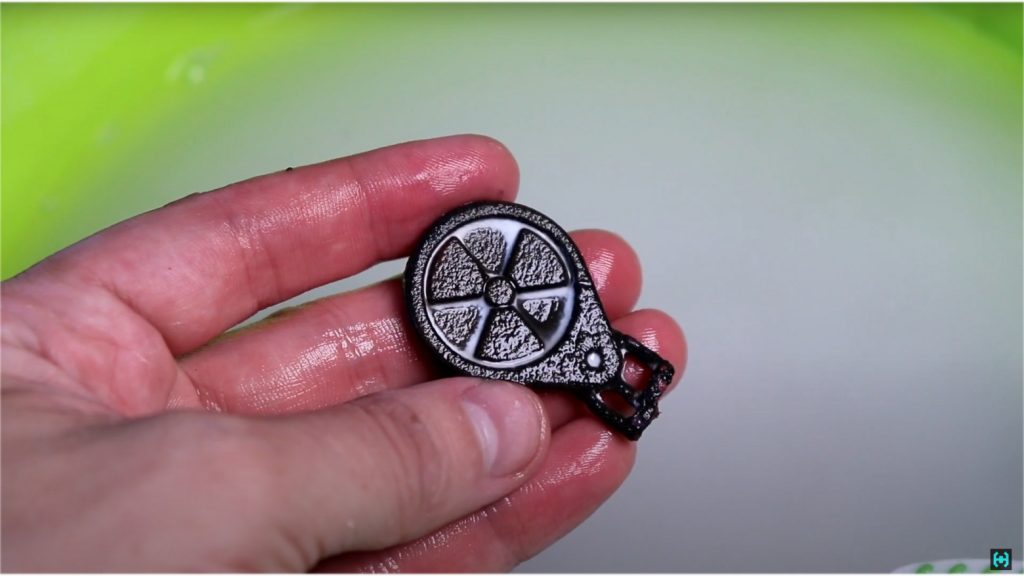
We dilute it with epoxy resin, and using a syringe, pour the composition into the recess of the keychain. The epoxy is quite liquid and will spread itself throughout the entire volume of the pattern. In a day we get two luminous artifacts. A couple of minutes of work and key chains can be attached to the keys. It’s amazing how a simple model printed at home on a 3D printer can turn into a metal product.
While charging the phosphor with an ultraviolet flashlight, I noticed that the molding sand in the background began to fluoresce in a beautiful yellow color. Places where there were wax models glow much less. Curiously, fresh molding sand does not have such properties, they appear only after calcination, and this is clearly visible in this frame.
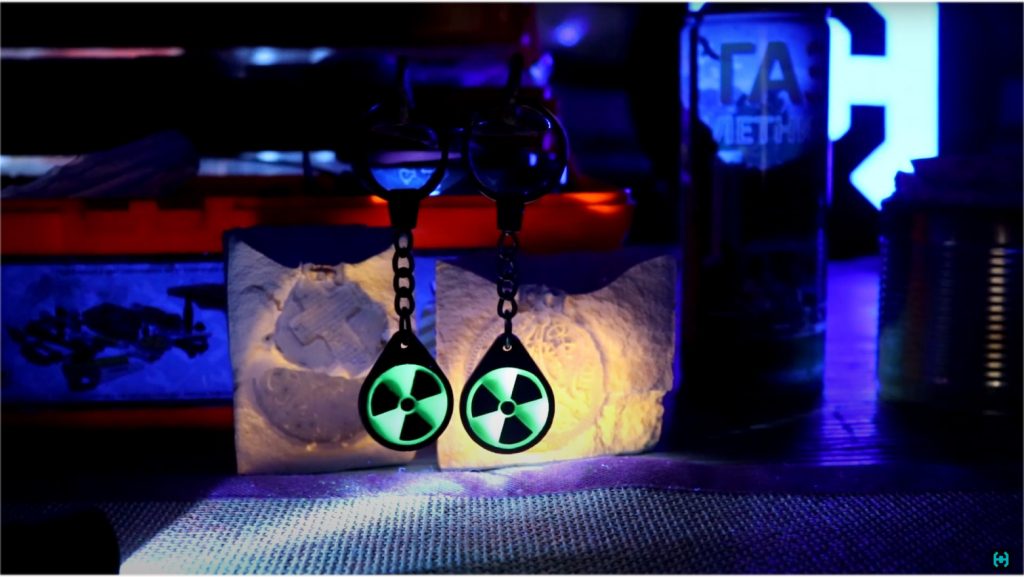
For reference. Filming for this episode took a little over a month. I had to repeat 3 full cycles of calcination of the flasks in order to understand why the surface of the burnt out photopolymer is peeling off. The platform on which the calcination took place, after all the experiments, crumbled into dust, the metal became like a dried cake that is easily broken by hands. The resulting key fob is completely safe, its background does not exceed the radiation fields in Chernobyl.
In parallel, shooting of casting products for future projects was carried out. In total, more than a hundred grams of antique silver were used. In the process, he received a couple of burns with a burner. In the future, it is planned to modernize the foundry equipment, a heated wax injector and a vacuum casting cup designed for vacuum casting will be assembled.